madebylakshmi

October 11, 2015

Its been a very long time since I made a jewellery. Lets catch up again. The easiest and ever pretty design is the jumkhees. May be because of its elegance or because of the traditional design I am more attracted to the Jumkhee designs than any other design. This weeks jewellery is a simple yet beautiful Pink and pearl combination Jumkhee.An adorable one it will make a pretty gift as well

Pink pearls

Continue reading

DIY Desk organiser

Having a pretty neat table, all my requirements on it A Computer in the middle a pen stand, phone stand, small succulent plant, cute keepsakes tiny photo frame having all this is my favourite wish to top all this I wanted most of them handmade. Since I am used to making handmade gifts to friends and family. I planned to make these things all by myself and I am halfway done

All of a sudden my best buddy gifted me one of this amazing gift a “Handmade Desk organizer”. Since I haven’t received many handmade gifts this one totally amused medesk organiser2

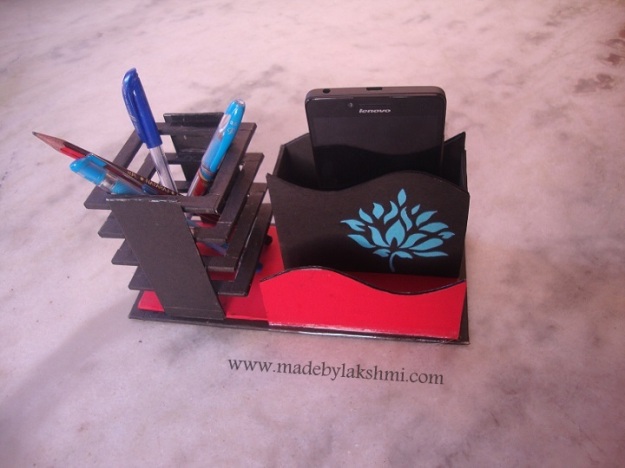
An amazing beautiful piece of art. I was impressed and so much happy and you know what ! Its completely handmade. I wanted to share it with all of you. He has even taken step by step photos ( My craft buddy is so adoringly creative)

Check out the design so beautiful such perfection ( The engineer in him claims for the perfect proportionate design ) so adorable. The choice of colours, the pretty floral pattern added as embellishment he has cut and pasted every piece separately such patience it takes. Such a worthy and most creative gift that made me go to clouds. Here we go
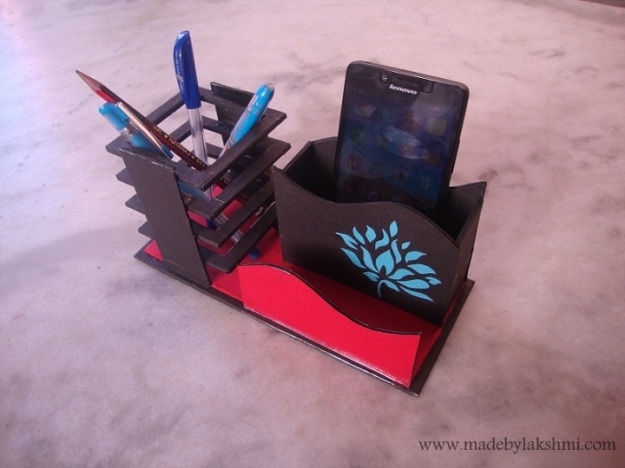
desk organiser1

Continue reading

Handmade Greeting Card – Happy Retirement

My dad was getting retired I didn’t plan any gift At the last moment I decided to give him a simple gift. But I wasn’t inclined to buying a gift that is not my style and It doesn’t give the happiness of handmade gift. So the simplest handmade gift to make at the last moment is a personalised greeting card. I usally add a memorable coto inside every greeting card I make that is the trick. A photo makes is personalised take us back to the memory and make us happy and we will love the card no matter how is it ! 🙂 So now shall we move to the real part of making the handmade greeting card. I used water colours my favourite painting technique added a few embelishments. Made it a little quirky. My dad loved it he was happy to recieve it as gift 🙂

final with wordings

Supplies Required :
• Card Stock
• Decorative floral paper
• Water colour
• Craft Glue
• Black Pen

My method :
1. I chose to make a square card so I Folded a cardstock in the shape of a square card
2. This forms the base of our card
3. Next step is to paint that additional embelishment. Actually I painted that flower pattern as a bookmark then as an after thought I added it as an embellishment in this cardsteps4. Once the water colour design is painted we are ready to assemble the card
5. First I stuck the Floral pattern on the left side of the card
6. Then the water colour emblishment was placed at the joint of the floral pattern and the cradstock overlapping both
7. Next is to cover the left out empty space in the card stock (the right side)
8. I used water colours to fill it up I used aqua blue and pink and blended them in between with wet on wet technique I allowed both colours to merge
9. Then I added a few texture patternss in the pink portion (Have a closer look you will find them ). I was just playing around
10. I added a smaller piece of floral design and card stock on the right side portion to write down the retirement date
11. As a final touch I added a few wordings for happy retirement wishes
12. Voila my pretty simple handmade “HAPPY RETIREMENT” card is ready
13. I made it for my Dad and he loved it ! Inside I wrote a personal wish and stuck a few memorable photos 🙂 Photos are really a pretty addition to any greeting card . Anyone will love to look back on the memorable picturesretirement card

Happy Crafting

sign

How to draw with a colour pencil

Hello Buddies 🙂

How are you doing its been a loooooooong time I have posted something here. Sorry for leaving my space unattended and keeping you all waiting. I have been held up with some exams and couldn’t post anything here. I almost forgot “Happy Ramzan” to all my Muslim buddies 🙂 Wishes and Apologies done now shall we move on to what I have in store for you. I wasn’t posting anything lately but I have been making few crafts now and then to keep me sane ;). So this week lets start with a lighter and easier post.

Colour Pencil drawing

In school every child might have used a colour pencil. It might have been our fancy to colour every colouring page given by our craft teacher. We get fascinated by the crayons and colour pencils when we were young. As we grew up we moved to better colouring means like paint water colour and many more. We have left behind the colour pencils and thought they were for kids and we think we have out grown it.

Its never a sin to go back to your childhood and relive those happiness. It makes us feeling good. Same way I thought of doing a colour pencil drawing in memory of my childhood colouring books. But this time the colouring was a bit matured :). Its not a bad idea anyway It turned out to be a pretty nice drawing. Let me show you how I made one !

Supplies Required :

  • Card Stock
  • Colour Pencil
  • Ordinary drawing pencil
  • Eraser

My Method :

  1. Since we are grown up now we will draw our own drawing instead of the colouring books
  2. So the first step is to trace the design in a simple pencil outline drawingPencil sketch full
  3. Once the design is complete slightly rub it with eraser It should be seen but not so prominentpencil sketch
  4. Now start colouring with the colour pencils
  5. I used only two colours. SInce mine is a floral design, Green for leaves and Pink for the flowers thats it I meant it to be simple
  6. First Green outline to the stem and leaves draw with little pressuretrace outline green
  7. Then colour the insides of the outline without pressure ever so lightly
  8. Next is the flower I drew the outlines darker and made few places opaque with thick colourTrace outline pink
  9. Then the left out part inside the flower was coloured pink but lighter like we did in the leavesComplete shading
  10. We are almost done.Now I made it a little darker here and there few finishing touches and I am amazed by my pretty drawing myself.Darken it
  11. Really a good drawing with such simple tools
  12. Go grab your set of colour pencils and make your pencil drawings in colour 🙂
  13. Have fun and do share your beautiful drawingsfill shade

Happy drawing 🙂

sign

Water colour painting

Watercolours is one of my most favourite painting colours. Every one of us must have used it from our childhood. We have been familiar with those colours but we never could easily predict the outcome :). That’s the interesting part of water colours they behave in their own way.

I haven’t done much of paintings but have done a few greeting cards and bookmarks with water colours. So I decided to do a simple painting with water colours along with my nephew who has come home for school annual holidays. And I have to admit it was lot more fun than we expected and there was more learning for both of us. Here we go with the two paintings we both made.scenary

This one I painted I loved the way the colours merged with each other

flower bunch

This one I helped my nephew to paint he is one creative kid ! What a lovely creation isn’t it. It was fun with him

Happy Painting

Signature

Handmade Bookmarks – Water colour – For kids

Making bookmarks was one of my favourite craft. I have made many different bookmark. I I almost had an obsession for making bookmarks. My buddy got inspired by me and he tried making a few bookmarks using chart paper and water colour. They are for kids, comic book since they look a little kiddish any kid will love to keep it between their comic book pages. The creative idea was making book marks in the shape of objects like bat, feather etc. It looks pretty cute idea isn’t it ? I personally kept all these bookmarks. Here we go a round up on his creativity

bat

feather

chevron

Happy Creating

sign

Jewelry Of The Week – JOTW#26

Hello Buddies 🙂

This week’s earrings is made out of quilling paper and wooden beads. This one is little different from the regular earrings I make. But its such a simple piece of cake anyone could just make it in seconds.But It looks stylishjotw26Supplies required:

  • Quilling paper (Black Colour)
  • Head pins
  • Ear hooks
  • PInk and blue wooden Beads
  • Quilling Needle
  • Wire cutter
  • Pliers

Method :

  1. Roll a black paper into a tight circle make four of them
  2. Take a head pin Insert beads and paper roll in this order Blue bead- Black paper-Pink Bead-Black Paper-Blue bead
  3. Now form a loop above this top blue bead and cut the excess wire
  4. Connect the ear hooks to the loop
  5. Thats it ! Simple isn’t it ?
  6. Apply varnish on the earring with a small paint brush. This is to make your earring resistant to water. 
  7. Thats it pretty paper jewelry ready 🙂
  8. Make your own jewelry and adore yourself 🙂

jotw26

Do you like these stuff ? Then Follow my blog to see more of these . You can find the follow button on the right side top corner of the page, take a moment to confirm subscription by checking the confirmation e-mail in your subscribed mail-ID. Also if you are in Facebook be kind to like my page here and support me

sign

Jewelry Of The Week – JOTW#25

Hello Buddies 🙂

This week’s earring is a beautiful designer earring you can flaunt with ! A brilliant combination of maroon and yellow triangular earringTriangular earring

Supplies required:

  • Quilling paper (Maroon and Yellow)
  • Ear hooks
  • Jump rings
  • Kundan/Rhine stones
  • Nose Pliers
  • Quilling Needle
  • Yellow beads

Method :

  1. Take a maroon paper cut into two halves and tightly roll it into 2 circles
  2. Take a yellow paper and roll over each maroon paper respectively tightly
  3. Take one more maroon quilling paper and roll it over a thick pen like marker. You will get a ring shape.Remove it from the pen
  4. You will get a circular ring press it in such way to form triangular shape
  5. Stick the yellow circle on inside this maroon triangle.Make sure it fits in snugly or add some more layers of yellow paper to the tight circle so it tightly sticks to the sides of the triangle. Now stick the circle inside the triangleTriangular earring
  6. Insert a jump ring on the top apex of the triangle. Also add an ear hook in the Jump ring.
  7. Close the Jump ring and Earring is almost ready
  8. Stick small white rhine stones on the centre of the circle to hide the hole in the centre as well as to add charm to the earring
  9. Stick a tiny yellow bead to the base of the triangle with feviquick
  10. Apply varnish on the earring with a small paint brush. This is to make your earring resistant to water.
  11. Thats it pretty paper jewelry ready 🙂
  12. Make your own jewelry and adore yourself 🙂 Triangular earring

Do you like these stuff ? Then Follow my blog to see more of these . You can find the follow button on the right side top corner of the page, take a moment to confirm subscription by checking the confirmation e-mail in your subscribed mail-ID. Also if you are in Facebook be kind to like my page here and support me

sign

Jewelry Of The Week – JOTW#24

Hello Buddies 🙂 Sunday post is published today due to technical problems One more cute earring ready for this weeks Jewelry of the week. Its a famous combination pink and blue. I used quilling papers and pearl beads and lesser jewelry making tools.

JOTW24

Supplies required:

  • Quilling paper(5mm)
  • Ear hooks
  • Jump rings
  • White half pearls (tiny rhine stone size)
  • Small white pearls
  • Nose Plier

Method :

  1. Take a half length(10cm) blue paper and similarly roll it as a tight circle
  2. Take a  pink quilling paper and roll it over a thick pen like marker. You will get a ring shape.Remove it from the pen
  3. I pressed it slightly on one side it turned into a tea drop shape
  4. Stick the blue circle in bottom of the pink tea drop (on the other side of the pinched edge).JOTW24
  5. Stick the small half pearl at the centre of the blue circle
  6. Insert a jump ring on the pinched edge of the pink tea drop. Also add an ear hook in the Jump ring.
  7. Close the Jump ring and Earring is almost ready
  8. Add a hanging small white pearl to the jump ring inside the tea drop shape
  9. Apply varnish on the earring with a small paint brush. This is to make your earring resistant to water.jotw24
  10. Thats it pretty paper jewelry ready 🙂
  11. Make your own jewelry and adore yourself 🙂jotw25Do you like these stuff ? Then Follow my blog to see more of these . You can find the follow button on the right side top corner of the page, take a moment to confirm subscription by checking the confirmation e-mail in your subscribed mail-ID. Also if you are in Facebook be kind to like my page here and support me

sign

DIY Greeting card – Womens day special

Hello Buddies 🙂

Happy women’s day to all the precious ladies in this world. It is one of the most special day for all the women. So all the ladies take some “me” time for you today. Do your most favourite thing today. Eat the best dish you like. Take some rest.Watch your favourite movie. Live the day happyly for yourself. Meet and wish all the ladies you have known ! Those you can’t meet send your wishes to them.

The best way to send in your wishes is through greeting cards and I always prefer handmade cards over the hallmark bought cards. Handmade may not be perfect but that’s the beauty of them. They have always made the person who receives it more happy than shop bought gifts.womens day card

Enough said let me show you the tiny and sweet greeting card for happy women’s day !

Supplies Required :

  • Card stock
  • Quilling paper
  • Craft glue
  • Rhine stone
  • Quilling needle

My method :

  1. Cut a card stock of required size
  2. Choose a design
  3. I did a small flower and a butterfly quilled flower
  4. To make the flower first 5 petals have to made .I used a green paper and formed this hollow petals by rolling the 3 mm paper around a pen then take it out and pinch it at one end to form tea drop shape
  5. Then make a tight small tea drop in pink color and insert inside this green outer petal
  6. Arrange them as a flower and stick a pink Rhine stone in the middle. Flower part is ready
  7. Then I made two leaves in black color attached them with a pink stem to the flowerQuilling card
  8. Then a tiny red butterfly with two loose coil tea drops thats all ready
  9. I added two pieces of left out papers as embellishment on the side
  10. Easy peasy card ready ! womens day card
  11. Write the wishes and post them

Do you like these stuff ? Then Follow my blog to see more of these . You can find the follow button on the right side top corner of the page, take a moment to confirm subscription by checking the confirmation e-mail in your subscribed mail-ID. Also if you are in Facebook be kind to like my page here and support me

sign